
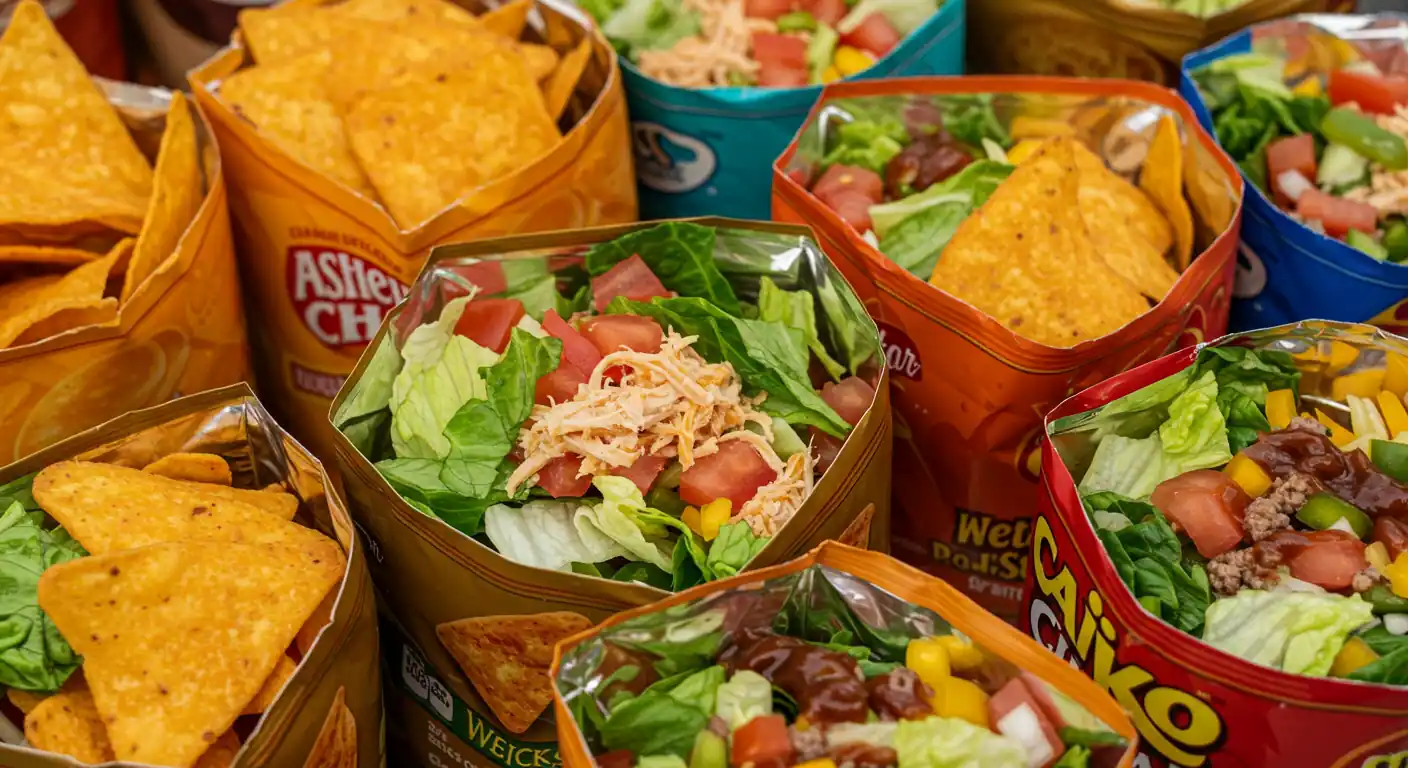
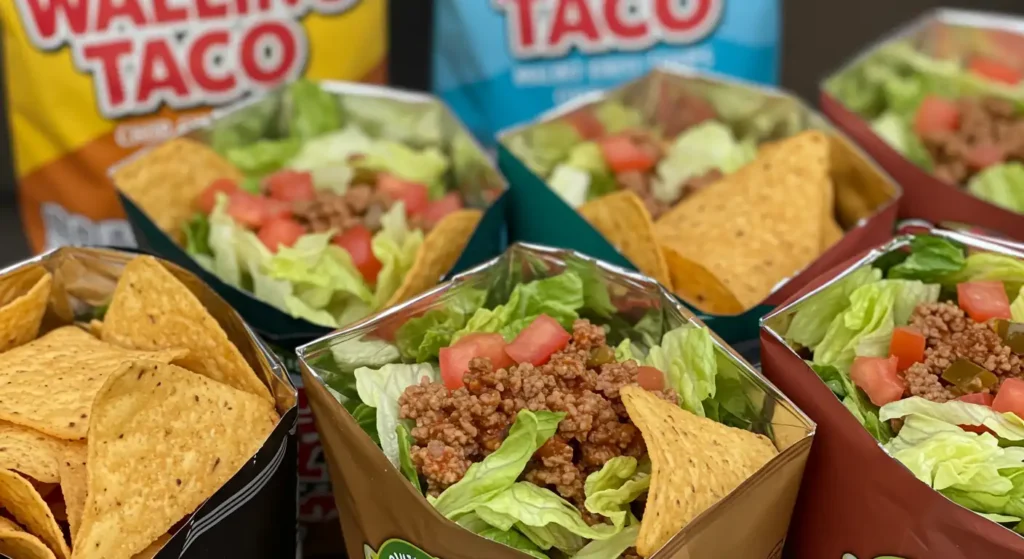
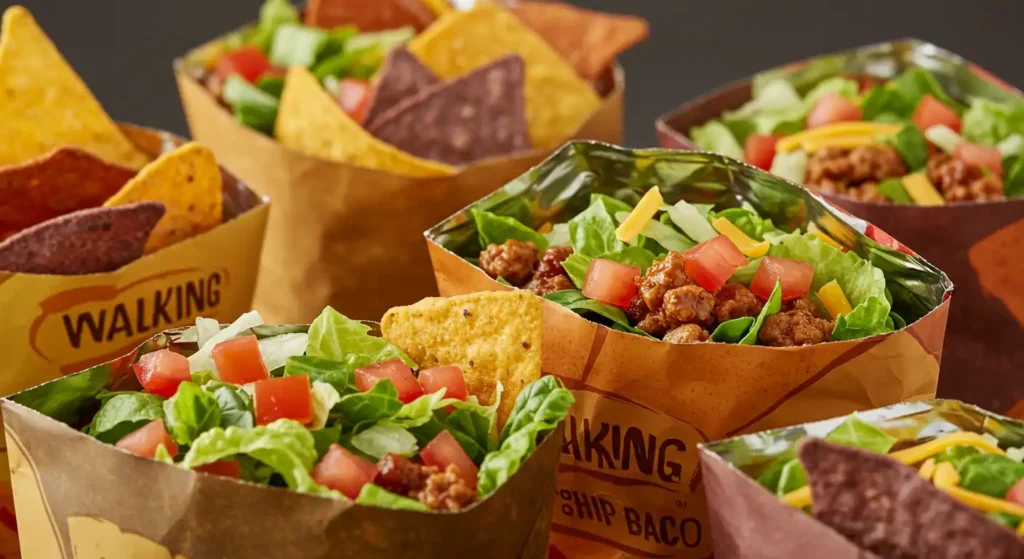
If you’re looking for a quick, fun, and flavor-packed snack that’s sure to impress at your next gathering, these Walking Taco Chip Bags are the perfect choice! Picture this: a crispy bag of chips filled with taco goodness—seasoned ground beef, fresh toppings, and tangy salsa—all ready to enjoy in a convenient, mess-free package. Whether you’re hosting a party, preparing a quick lunch, a simple dinner, or craving a satisfying snack, this recipe is as versatile as it is delicious. Plus, with just a few easy steps, you’ll have a crowd-pleasing treat that everyone can customize to their taste. Ready to dive in? Let’s get started with this ultimate snack idea!
Table of Contents
Why You’ll Love This Recipe
There’s so much to love about Walking Taco Chip Bags—they’re simple, customizable, and guaranteed to be a hit at any event! Here’s why you should try them:
- Quick & Easy: In just a few minutes, you can transform a bag of chips into a delicious, satisfying meal or snack. The prep time is minimal, making this recipe perfect for busy days, quick lunches, or spontaneous get-togethers.
- Mess-Free Fun: No plates, no utensils, just the bag! The convenience of walking tacos makes them a great option for parties, picnics, or a fun dinner idea for kids and adults alike.
- Totally Customizable: One of the best things about this recipe is how easily you can adjust it to suit your tastes. Whether you like it mild or spicy, with beef or chicken, you can add whatever toppings you love. The possibilities are endless—nacho cheese, shredded lettuce, diced tomatoes, or even guacamole—make it your own!
- Crowd-Pleasing: These taco chip bags are ideal for groups. They’re easy to serve, and everyone can fill their bag just how they like it. Whether you’re hosting a party, bringing a dish to a potluck, or simply having a casual family meal, this recipe is sure to be a favorite.
- Perfect for Meal Prep: Want to make this ahead? No problem! You can easily prepare the taco filling, store it in the fridge, and assemble the walking taco chip bags when you’re ready. It’s a make-ahead meal that keeps on giving.
Ingredients
Now that you’re excited to make these Walking Taco Chip Bags, let’s gather the ingredients you’ll need. The beauty of this recipe is its simplicity, but you’ll still get all the delicious taco flavors that everyone loves. Here’s what you’ll need:
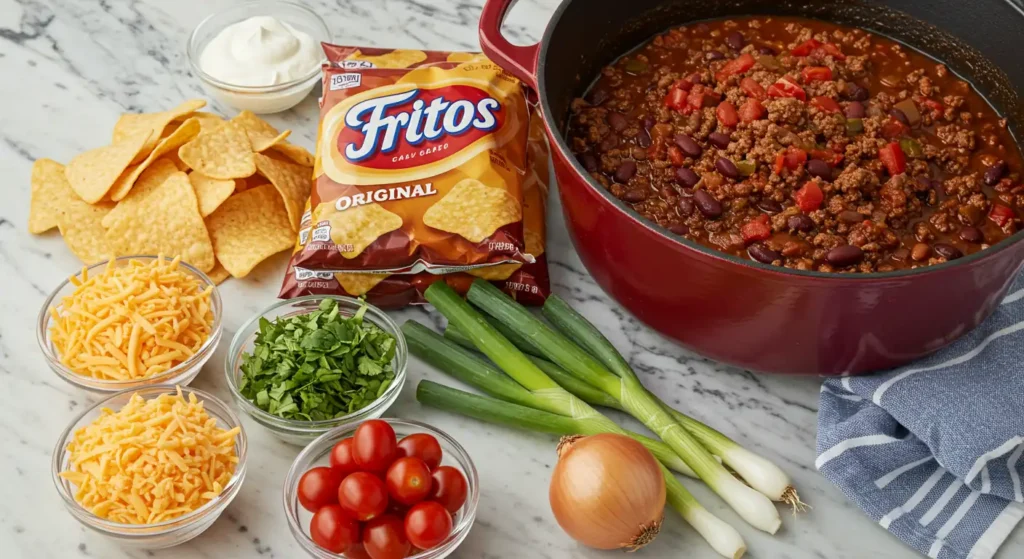
- 1 lb ground beef (or ground turkey/chicken for a leaner option)
- 1 packet taco seasoning (or homemade taco seasoning for a personalized touch)
- 1 large bag of tortilla chips (nacho cheese or plain, depending on your preference)
- 1 cup shredded cheese (cheddar or a Mexican blend works great)
- 1/2 cup sour cream (optional, but adds a creamy texture)
- 1/2 cup salsa (mild, medium, or hot—whatever suits your taste!)
- 1/2 cup chopped lettuce (adds a nice crunch)
- 1/4 cup diced tomatoes (fresh or pre-chopped)
- Jalapeños or hot sauce (optional, for an extra kick)
Optional Toppings:
- Guacamole or avocado slices
- Black olives, chopped
- Chopped onions or cilantro
- Sliced olives or pickled jalapeños for extra flavor
Quick Tips:
- You can always customize your toppings! If you prefer a vegetarian version, swap the ground meat for black beans or refried beans.
- If you’re making this for a crowd, consider setting up a taco bar with all the toppings laid out for people to build their own walking taco chip bags. It’s fun and interactive!
- Pre-chop your toppings ahead of time so you can quickly assemble everything when you’re ready to serve.
Step-by-Step Instructions
Now that you have all your ingredients ready, let’s dive into making these Walking Taco Chip Bags. Don’t worry—this recipe is super easy and quick to put together! Follow these simple steps, and you’ll be enjoying your taco-filled chip bags in no time.

- Cook the Meat:
- In a large skillet over medium heat, cook the ground beef (or your preferred protein) until browned, breaking it up with a spoon as it cooks. This should take about 5-7 minutes.
- Drain any excess grease, then add the taco seasoning along with the amount of water specified on the packet (usually 1/4 cup). Stir well to combine and simmer for another 2-3 minutes, allowing the flavors to meld.
- Prepare the Chip Bags:
- While the meat is cooking, grab your bag of tortilla chips and gently crush them. You don’t want to turn them into crumbs, just a bit of a rough crush so they’re easier to fill.
- Carefully cut the top of each bag to open it wide enough for filling.
- Assemble the Walking Taco Chip Bags:
- Spoon a generous amount of the taco meat mixture into each chip bag. Don’t worry about overfilling—it’s all part of the fun!
- Top with your favorite toppings: sprinkle on some shredded cheese, add a spoonful of sour cream, and drizzle with salsa. If you’re feeling adventurous, toss in some jalapeños, diced tomatoes, or even guacamole for an extra burst of flavor.
- Mix It Up:
- Once everything’s inside, use a fork or spoon to gently stir the ingredients together right inside the bag. This way, you get a delicious taco filling with every bite!
- Serve and Enjoy:
- Serve immediately, and watch everyone’s faces light up as they dig into their own custom walking taco chip bags. They’re great for sharing, but trust me, you’ll want one for yourself!
Pro Tip:
If you’re making these for a crowd, consider prepping the taco meat ahead of time and keeping it warm in a slow cooker. This way, your guests can simply grab a bag of chips and add their preferred toppings.
Tips for Success
To make sure your Walking Taco Chip Bags turn out perfectly every time, here are some practical tips that’ll help elevate your snack game:
- Choose the Right Chips:
- Opt for sturdy tortilla chips that can hold up to the weight of the taco filling. Nacho cheese chips work great for added flavor, but plain chips are an excellent base if you want the toppings to shine.
- Don’t Overfill the Bag:
- While it’s tempting to load up your chip bag with tons of taco fillings, be mindful not to overstuff. You want just enough to mix well without the risk of it all spilling out when you start digging in. A little goes a long way!
- Warm the Taco Meat:
- For an extra layer of comfort, serve your taco meat warm. If you’re making this ahead of time, you can keep the meat warm in a slow cooker or on the stovetop over low heat.
- Balance the Toppings:
- The key to a great walking taco is the balance of flavors. From creamy sour cream to spicy jalapeños, make sure you mix up cool, creamy, and crunchy toppings for the ultimate flavor experience.
- Customization is Key:
- The beauty of walking tacos is that they’re highly customizable! Feel free to swap out ingredients based on dietary preferences or what you have on hand. Try adding black beans, using a non-dairy cheese, or making a spicy salsa for a personal touch.
- Consider the Presentation:
- If you’re serving these at a party or gathering, consider adding some extra flair with fun serving ideas. Use mini chip bags for individual portions, or serve them in clear cups for a more visually appealing presentation.
- Keep It Fun and Interactive:
- This recipe is perfect for a taco bar-style gathering. Lay out all the toppings and let guests build their own walking taco bags. This adds an interactive element to the meal that everyone will enjoy.
Variations & Serving Ideas
While Walking Taco Chip Bags are already a crowd-pleaser, the fun doesn’t have to stop there! There are endless ways to customize this dish to suit different tastes, dietary preferences, and occasions. Here are some creative ideas to make your walking tacos even more exciting:
1. Meat Alternatives:
- Ground Turkey or Chicken: Swap the traditional beef with ground turkey or chicken for a leaner option that still packs tons of flavor.
- Vegetarian Option: For a plant-based twist, use seasoned black beans, lentils, or crumbled tofu in place of the meat. This is a fantastic option for vegetarians and vegans, and it’s just as hearty!
- Fish Tacos: Want to try something unique? Try using grilled fish like tilapia or salmon for a refreshing seafood twist. Top with some mango salsa for a tropical vibe.
2. Toppings Galore:
- Crunchy Additions: Want to add some extra texture? Try crushed taco shells, crisp lettuce, or even crispy bacon bits for an extra crunch in each bite.
- Fresh & Zesty: Add some fresh cilantro and a squeeze of lime juice for an added burst of freshness. The citrus balances out the richness of the taco filling beautifully.
- Cheese Variety: Mix up your cheese selection—go with shredded cheddar, monterey jack, or even queso fresco for a creamier finish.
- Salsa Bar: Set up a salsa bar with a variety of options, like pico de gallo, roasted tomato salsa, and spicy verde salsa. This way, guests can pick their heat level!
3. Gluten-Free Options:
- Gluten-Free Chips: Make sure to use gluten-free tortilla chips for anyone with gluten sensitivities. There are plenty of tasty options available, and they’ll still hold up to the taco fillings.
- Rice Base: For a fun variation, serve your walking tacos in a bowl of rice for a gluten-free alternative. Just spoon the taco filling on top and load it up with your favorite toppings.
4. Party Presentation:
- Mini Bags: If you’re hosting a party or serving a large crowd, use mini chip bags for individual servings. It’s not only cute but also makes it easy for guests to grab and go.
- Taco Bar Style: Set up a taco bar with all the fillings and toppings laid out in bowls, allowing guests to build their own perfect walking tacos. This is ideal for casual parties or gatherings where everyone can customize their own flavors.
5. Perfect Pairings:
- Side Dishes: Serve your walking tacos with a side of Mexican street corn, a fresh guacamole dip, or mexican rice to round out the meal.
- Drinks: For a refreshing drink, serve margaritas, lime-infused water, or even a cold Mexican beer for the perfect taco night.
6. Meal Prep & Leftovers:
- Walking tacos make for an excellent meal prep option! You can prepare the taco meat and toppings in advance, and assemble the bags when you’re ready to serve. This is great for busy days when you need a quick meal.
- Leftovers: If you have any leftovers, store the taco meat in an airtight container in the fridge for up to 3 days. You can use it again for tacos, burritos, or as a topping for nachos.
7. Doritos Walking Tacos:
For an even more indulgent option, swap the regular tortilla chips for Doritos. This adds an extra layer of flavor and crunch that everyone will love! Here’s how to make this variation stand out:
- Choose Your Dorito Flavor: Whether it’s the classic Cool Ranch or the bold Spicy Nacho, the Doritos flavor adds a fun twist to the traditional walking taco. You can even mix and match for a unique taste experience.
- Perfect Pairings: Doritos work wonderfully with a mix of cheddar cheese, sour cream, and your favorite toppings. The tangy ranch flavor pairs beautifully with salsa and guacamole, creating a flavor-packed bite.
- Extra Crunch: Doritos are already crunchy, but if you want an extra crunch in every bite, consider adding a sprinkle of crushed Doritos on top of your taco fillings before serving.
FAQs: Your Walking Taco Chip Bags Questions Answered
Got questions about making Walking Taco Chip Bags? You’re not alone! Here are answers to some of the most common questions to help you make the most of this tasty and fun recipe.
1. How can I make these Walking Tacos gluten-free?
Making gluten-free Walking Tacos is easy! Simply choose gluten-free chips such as corn chips or certain tortilla chips that are certified gluten-free. For the taco filling, use gluten-free taco seasoning and be mindful of your toppings. Fresh veggies, cheese, and salsa are all naturally gluten-free, making it a breeze to customize for dietary needs.
2. What is another name for this walking taco recipe?
Walking Tacos are also commonly known as Taco in a Bag or Taco Chip Bags. These names all refer to the same fun, portable snack—where you load taco fillings into a single-serving chip bag, perfect for on-the-go eating.
3. What is the difference between a taco and a walking taco?
The main difference between a taco and a Walking Taco is that a traditional taco is served on a flat tortilla, while a Walking Taco uses a small bag of chips as the “shell.” It’s a fun, portable twist on the classic, allowing you to enjoy all the taco flavors in a convenient, handheld form!
4. Who made the first walking taco?
The Walking Taco is often credited to Jim Fouts, a Michigan politician, who popularized the dish at local fairs in the 1960s. However, variations of this idea have been around for many years. The simple concept of using a bag of chips as a taco shell has quickly become a favorite for outdoor events, parties, and school lunches.
5. How to prepare the chip bag for walking tacos?
To prepare the chip bag for your Walking Tacos, gently crush the chips inside the unopened bag. This creates a smaller “base” to make room for your taco filling and toppings. Then, simply cut a small opening at the top of the bag, and you’re ready to load it up with your delicious taco fillings.
6. What are some other toppings I can add to the walking taco chip bags?
There are endless possibilities when it comes to toppings for your Walking Taco Chip Bags! Here are some popular choices:
- Shredded lettuce
- Diced tomatoes
- Sour cream
- Guacamole
- Chopped onions
- Cilantro
- Shredded cheese (cheddar, mozzarella, or a spicy blend)
- Salsa or hot sauce (for an extra kick)
- Olives, jalapeños, or chopped bell peppers for extra flavor and crunch
Feel free to get creative with your toppings and customize the Walking Tacos to suit your taste!